Connectivity
If you’re having trouble connecting to your Minecraft server there’s a process you should follow in order to try and understand where the issue lies. If you’re running on a third party hosting provider it’s recommended to reach out to them directly or check their status page.
Server Binding to Port
Section titled “Server Binding to Port”The first thing to check is that your server binds to the right port when you start it up, firstly you should see some errors in the console. This error will normally come from having two server processes running at the same time or you run an application on the same port as your Minecraft server.
...
**** FAILED TO BIND PORT! ****The exception was: java.net.BindException: Address already in usePerhaps a server is already running on that port?
...
You can fix this by going to the server.properties file and look for the server-port variable and increase the number by 1. When you restart the server you should see the server start up without issues.
If you don’t see the above error message you can check using Powershell or Bash that your server is listening.
Windows
Section titled “Windows”If you’re running on windows please use the following command within a Powershell prompt.
...
netstat -ano | find "{SERVER-PORT}" | find "LISTEN"
...If you’re running a linux distribution please use the following command within your active shell session.
...
netstat -anpe | grep "{SERVER-PORT}" |grep "LISTEN"
...
Regardless of the operating system being used you should see one entry bound to 0.0.0.0, if you don’t go back and ensure the server-port variable has been set properly.
OS Firewalls
Section titled “OS Firewalls”Now we know that the server is running on the right port you should check that the connection is allowed to break out past ‘localhost’ (the pc the server is running on). You can run the following command(s) depending on your OS to ensure the local firewall is configured.
Windows
Section titled “Windows”If you’re running on windows please use the following command within a Powershell prompt.
...
netsh advfirewall firewall add rule name= "Open Port 25565" dir=in action=allow protocol=TCP localport=25565
...If you’re running a linux distribution please use the following command within your active shell session.
...
sudo iptables -I INPUT -p tcp -m tcp --dport 25565 -j ACCEPT
...
To ensure things are all working locally within your network, attempt to connect from another device in your house to the internal LAN address. e.g. 192.168.1.58:25565
You can find your host devices internal LAN address by running ipconfig within command prompt or ip addr / ifconfig will work on Linux within the shell session.
External Port Forwarding
Section titled “External Port Forwarding”Providing you can connect internally to your server, the issue most likely falls with either your router and port forwarding or your ISP and their use of CGNAT.
The first thing we need to check is port forwarding is configured correctly.
- Login to the admin interface (normally on http(s)://192.168.1.254 or http(s)://192.168.1.1)
- Admin username and password is normally on the bottom but a Google search may also help
- Look for a ‘Port Forwarding / NAT folder’
- You may need to go into any ‘Advanced Settings’ tab first
- You should ensure the rule has been configured as expected
- Service Name - ‘Minecraft’
- Protocol - ‘TCP’
- Internal IP - ‘Internal LAN IP of Host Device’
- Internal Port - ‘Match server.properties file’
- External Port - ‘Match server.properties file’
- Save changes
If all has been successful you should see OPEN but if you still see CLOSED it could be possible you’re running behind CGNAT.
You can find a great explanation on CGNAT below.
SRV Troubleshooting
Section titled “SRV Troubleshooting”Since release 1.3 Minecraft supports a method of connectivity called SRV Records. In principle they allow you to bind a hostname such as play.example.com to an IP address and a non-standard port.
Without an SRV record, if your Minecraft server is running on a non-standard port such as 25570, players would need to connect using:
play.example.com:25570
With an SRV record configured, players only need to enter:
play.example.com
The SRV record tells the Minecraft client which port to use automatically.
Choosing a Hostname
Section titled “Choosing a Hostname”Before creating your SRV record, you first need a hostname for it to point to.
You have two options:
- Use your hosting provider’s connection hostname. This is normally the same hostname you use to connect via SFTP or your game panel, for example
node01.host.example.com. - Create your own Host record (A or CNAME). This is required if your provider only gives you an IP address or if you would prefer to use your own hostname.
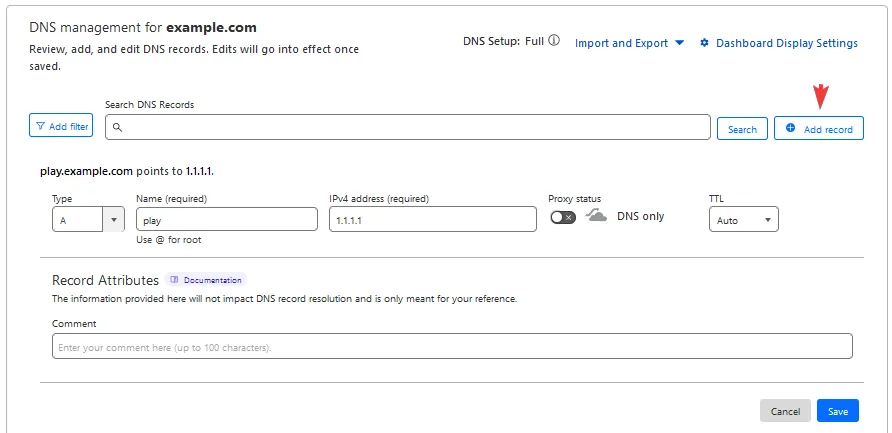
If you need to create your own Host record, you can do so as shown below.
Once you have a hostname, create your SRV record as follows:
_minecraft._tcp.<subdomain> <TTL> IN SRV 1 1 <port> <hostname>
- Subdomain - This is the address your players will connect with, for example
play. - TTL - Set this to Auto if using Cloudflare DNS or 3600 in most other DNS providers.
- Port - This should be the port your Minecraft server is currently listening on.
- Hostname - This should be either your hosting provider’s connection hostname (for example
node01.host.example.com) or the Host record you created above.
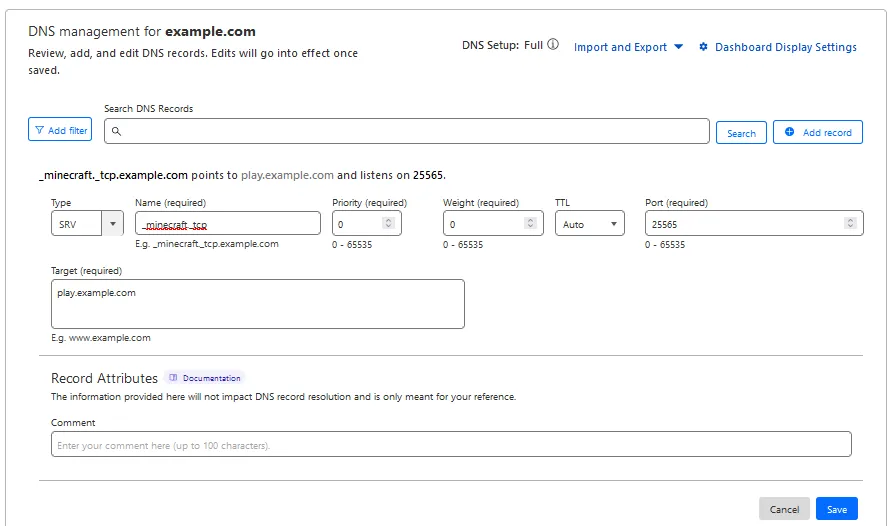
An example of a functional SRV record has been provided below. This was created in Cloudflare’s DNS manager, so if Cloudflare is not your DNS solution then you may have a slightly different interface.